|
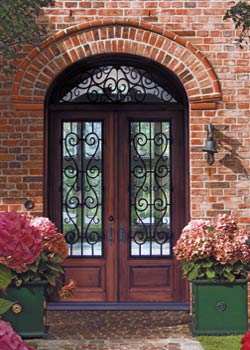
Custom Doors
|

|
|

 |
Installing Your
Texas Custom Doors
and Complete Entryways
A New Front Door Can Change The Whole Look Of Your Home.
If your front door is old and worn out, or if you're simply getting tired of the way your house looks, it might be time for a new front door. New doors are often more energy efficient than older doors, and they also offer better security. |
Handling * Maintenance * Warranty Information below
|
New Front Door
Installation Instructions
|
| Materials:
measuring tape
pry bar
hammer
chisel
hammer
screwdrivers
drill, with drill bits and driver bits
utility knife
hacksaw or reciprocating saw
with metal-cutting blade
|
circular saw
miter saw
wooden shims
caulk gun with butyl caulk
pre-hung door
exterior trim
weather stripping
safety glasses
work gloves |
For Warranty purposes, All products must be installed by a Licenced Contractor
or work under the direction of a Licenced Contractor
Steps:
* Although you can install a door from scratch, it's easier to install a pre-hung door, which includes a pre-assembled doorjamb with the door attached.
- Start by measuring the opening for the doorway; measure for the actual doors as well as for the rough opening. That way you'll be sure your new door will fit properly.
- After you get the new door, remove the old one by tapping out the hinge pins and pulling the door off the hinges.
- Use a utility knife to score between the molding and the interior wall, and remove the molding with a pry bar. Be careful when you remove the molding; you might be able to reuse it.
- Unscrew the hinges from the jamb; there may be some long screws that extend into the wall studs.
- Use a circular saw to cut through part of the jamb (shown below), about halfway up, and then pry the remaining portion away with your hands or a pry bar. Remove the entire jamb. You may need to use a utility knife to break the caulk seal between the jamb and exterior wall. Also, a hacksaw or reciprocating saw may be needed to cut through any fasteners that won't come out.

* Check the door manufacturer's instructions regarding removal and installation of the doorbell.
- Check the doorway opening to be sure it's plumb and level before you start installing the new doorjamb. In some cases you might want to remove the subsill (shown below ), which lies beneath the threshold; however, if it's in good shape you can leave it in place.

- Dry-fit the new door to be sure it fits properly. You may need help moving the door.
- Pull the door back out of the opening, and run a generous bead of butyl caulk along subsill (figure below).

- Attach two pieces of scrap wood in the upper corners of the doorway on the interior side. The wood will act as a brace to help hold the door upright.
- Set the bottom of the door in place, and raise the top into position. Make sure it's plumb and level, and temporarily nail the frame into place.
- Insert shims between the frame and the wall to prevent the door from shifting from side to side.

Place shims behind every hinge as well as any other place that appears to be bowed inward. Then secure the door by driving tenpenny finish nails through the jamb and shims.

- Trim off excess shims with a utility knife; just score along the shim and break it off.
- For additional security, remove one short screw from each hinge and replace it with a longer screw that extends into the wall stud, for units with sidelights the screw would extend into the double jamb.
- Open and close the door to test the operation. You can make sure it's level by opening the door to a certain point and then leaving it; if it doesn't move, you've done it right.
- Apply exterior trim such as brick molding. When the trim is in place, run a bead of caulk between it and the exterior wall.
- Push fiberglass insulation between the doorjamb and the wall; don't push it in too tightly because you'll reduce its effectiveness.
- Attach interior trim around the door. If you're not reusing your original interior trim, try to find something that will be large enough to cover any imperfections you might have caused when you removed the door.
- Install weather-stripping if the door manufacturer recommends it.
- Install the door handle and deadbolt lock.
Manufacturer
Handling * Maintenance * Warranty Information below
INSTALLING A WOOD DOOR UNIT WITHOUT ADEQUATE ENTRYWAY PROTECTION FROM DIRECT EXPOSURE TO THE ELEMENTS WILL VOID THE WARRANTY!
For Warranty purposes, All products must be installed by a Licenced Contractor

Hardwood doors are warranteed for a period of ONE year from the date of shipment to be of good material and workmanship, and to be free of defects at the time of shipment that would render them unfit for the purpose for which each door is recommended. Before leaving our facility, your door has been inspected for any defects in materials and workmanship and is packaged to protect the door in transit. Please notify Texas Custom Doors within 7 days of delivery for any missing items or incorrect orders. Damage must be reported within 48 hrs of delivery.
The following are circumstances which are not considered the responsibility of Texas Custom Doors and will void the warranty:
- Damage caused by improper installation, finishing and maintenance, or by attempts to perform any repairs to the door other than by a Licensed contractor installer.
- Damage, misuse or abuse caused by other parties.
NOTE: All units must be inspected upon receipt to the store/customer, as damage claims are void after the product has been received and signed for as "Free of Damages".
- Failure to properly finish all door/sidelit e/transom surfaces and/or jamb materials immediately. This includes units that will be stored in excess of 30 days prior to installation.
- Trimming of door or any other cutting of the door. Any cut, trimmed, bored and/or mortised doors or sidelights are not warranted.
- Natural variations in the color of the wood or in the texture and grain of the wood.
- Doors which are improperly installed or do not swing freely
- Installing a wood door in prolonged sunlight.
- Panel Shrinkage
- Warpage shall not be considered a defect unless it exceeds 1/4" in the plane of a door up to 36" wide and up to 80" tall. 96" height would be 1/2". Doors greater than these dimensions are not covered by warranty. This distance shall be determined by placing a straight edge on the suspected concave face of the door and measuring the point of maximum distance between the bottom of the straight edge and the face of the door, accounting for panels and glazing recess. Action on any claim of warpage may be deferred at the option of Supplier for a period not to exceed 12 months, since it is not uncommon for a temporary warp condition to occur as the door adjusts to local humidity and temperature conditions. Natural variations in color or texture of any wood grain finish shall not be considered a defect.The process used in making some decorative glass can cause natural, bubble-like areas to form in the glass. These are natural occurrences from the manufacturing process and shall not be considered a defect. Any modification to the product will void warranty.
- Entryway must provide an adequate overhang for your wood entry door investment. A good rule of thumb for the wood entry door/overhang equation is, the overhang should extend outward at least 1/2 the height of the entire entryway and a minimum of 3' of either side of the wood entry door unit. Stand in your entryway, take a tape measure and measure from your feet and upward to the bottom of the overhang. If the height is 10' then the projection will need to be 5' outward. Now for the width, extend the tape measure 3' and place on the outer left and right side of the wooddoor unit, this is how far the overhang should be in width. This general rule will help provide a protective "umbrella" for your wood entry door.
 Roof Overhang: Adequate roof overhang depends upon the directional exposure (north, south, east, or west) of the entryway, and upon the geographic region of the installation an adequate roof overhang (see picture at right) is one in which the roof overhang projects out a distance from the structure no less than one-half the elevation difference between the lowest edge of the door and the base of the overhang's highest point above the entryway. The calculation is shown below: Roof Overhang: Adequate roof overhang depends upon the directional exposure (north, south, east, or west) of the entryway, and upon the geographic region of the installation an adequate roof overhang (see picture at right) is one in which the roof overhang projects out a distance from the structure no less than one-half the elevation difference between the lowest edge of the door and the base of the overhang's highest point above the entryway. The calculation is shown below:

NOTE: TCD is not responsible for the finishing or refinishing of any door, nor the installation or re-installation of any door.
The manufacturer's sole responsibility is as stated herein and it shall not be liable for consequential, indirect, or incidental damages, or for any amount in excess of the price paid for the doors involved.
Except as set forth above, TCD makes no other warranty, expressed or implied, with respect to the product.
TCD is not responsible for installation labor.
For warranty purposes, all products must be installed by a Licensed Contractor.
Handling & Care of Your Product:
Upon Receiving Your Door Unit
- Inspect your door unit immediately, If the door was damaged by common carrier in transit, then the recipient must submit a claim report for any damages or defects to the store in which you made your purchase.
- Concealed damages will not be covered after 48 hours or once the door unit has been installed.
- Compensation will not be offered after door unit has been installed.
Maintenance for Pre-Finished Wood Entry Doors:
Thank you for the purchase of your wood door unit. Your new door unit is a fine piece of furniture and must be maintained as such. Exposure to the elements (sun, rain, snow, sleet and air pollutants)
will cause a well finished door unit to be affected. The following requirements will help you understand the maintenance needed to protect your investment.
- Direct sunlight will cause the finish on any door to deteriorate faster.
- The entryway must provide adequate protection against the elements.
- Inspect your door unit periodically. If the topcoat has been damaged or is showing signs of deterioration another coat will need to be reapplied.
- Depending on the environment, the door unit will need to be refinished periodically.
Maintenance for Un-Finished Wood Entry Doors:
- Door slabs must be stained or primed and painted on all six sides immediately.
- Door units must be completely stained or primed and painted immediately.
- Use good quality oil base or acrylic latex paints.
- Do not use a water base primer.
- If painting -- Higher gloss paints will offer better protection than a "flat/low gloss" paints. Do not use a dark colored paint if the unit is receiving direct sunlight.
- If staining -- Follow the stain manufactures instructions and the maintenance instructions listed.
Storage and Handling:
- Do not subject your door unit to any extreme conditions such as but not limited to heat, cold, dryness, moisture, dampnes
- s, humidity.
- Store in a well ventilated area.
- Deliver door unit to the jobsite only after plaster, texture and/or cement is dry.
- Proper Overhang for Wood Entry Doors
- Wood Entry Doors are a beautiful investment for your home. Like a fine piece of wood home furniture, they have to be maintained and protected. You would not leave your fine wood furnishings directly exposed to Mother Nature's elements nor would you choose not to maintain them. The same is true for your homes wood entry door.

Manufacturer does not warrant any product against glass breakage or glass damage for any reason.The following glass panel warranties shall be void if the unit has not been stored, installed, and maintained in a good and workmanlike manner, or if the damage is resulting from exposure due to installation in an unprotected opening, such as an installation without sufficient roof covering protection, which causes the door and glass panel to be exposed to an unusual amount of direct sunlight and/or precipitation.All beveled glass and textured glass panels are hand made.Therefore, some bubbles and imperfections are acceptable in the glass.
Single glazed panels: Manufacturer warrants that your single glazed panel will not be subject to water leakage caused by precipitation for a period of ONE year from date of manufacture.
Triple glazed (IG) insulated tempered glass panels: Manufacturer warrants our insulated glass panels for a period of FIVE years from the date of manufacture of the insulated glass panel, against permanent failure of the hermetic seal directly attributed to defective manufacturing, which failure results in permanent obstruction of vision through the panel. I/G panels 67" or taller, due to the extreme length of glass, may Flex or have a slight rattle and is not considered a defect unless accompanied by failure to the hermetic seal causing permanent obstruction to vision.
This warranty does not apply if the failure of the seal is caused by an Act of God, damage as a result of exposure to corrosive fumes or condensates, damage resulting from excessive stress from movement of the structure, glass distortion or breakage, mishandling or improper installation or by any other cause whatsoever not within our exclusive control, and shall not apply unless the failure occurs and claim is delivered to us within FIVE years after the date of manufacture of the insulated glass panel.
Texas Custom Doors
Leaded Glass Doors
Stained Glass..French Doors
Beveled Glass..Mahogany Doors
Phone: 1-409-840-2002
©2002 Copyright TexasCustomDoors.com. All Rights reserved.
|
